Shop notes are an often neglected tool of the woodturner. Planning your project helps you avoid mistakes and reduces your turning time. Keeping shop notes is easy with this template. Add them to your toolbox today.
I can recall several occasions where I had turned a wonderful project. One was a seed pot maker and the other was a ball winder. Then I was asked to repeat the project. This would be simple right? Well I had not written down any notes. So the second time through was about the same as the first as I had to figure out what I needed, how large the wood needed to be, and how I would go about turning the project on the lathe. I could have saved a lot of time with a simple shop note of the project.
Benefits of keeping project notes
These shop notes serve several useful purposes.
- To record what you have done.
- To record the method of turning and any tips that you figured out on the way.
- Writing the notes down helps you avoid problems in how to turn the project.
- T0 record dimensions and sizes.
- They record changes you made to the initial plans.
- You write down your woodturning ideas so you don’t forget them.
- They are a great way to help your memory.
- To improve the efficiency of your woodturning production.
- They help you remember and organize the supplies you need in your workshop.
To make this easier I have a template that you can download here for your turning projects. This is not to put you in a bind or to curb your creativity. It is to give you a hand in remembering what you did on a project so that you can return to that project and either repeat it or improve it. (Clicking on the button opens a pop-up box to collect your information. Please enable pop-ups in your browser if it doesn’t work.)
“It may seem counter-intuitive, but by taking time to plan up front, the overall time and effort to complete a task can be significantly reduced.” The 12 Week Year, Morgan & Lennington. Pg. 90 As you grow in your experience as a woodturner you will know how to turn spindles and bowls with the least amount of effort. At the beginning, keeping notes will help you understand the turning process and how you, personally, like to turn. These shop notes will help woodturners and woodworkers be more efficient.
What do you record on each project note?
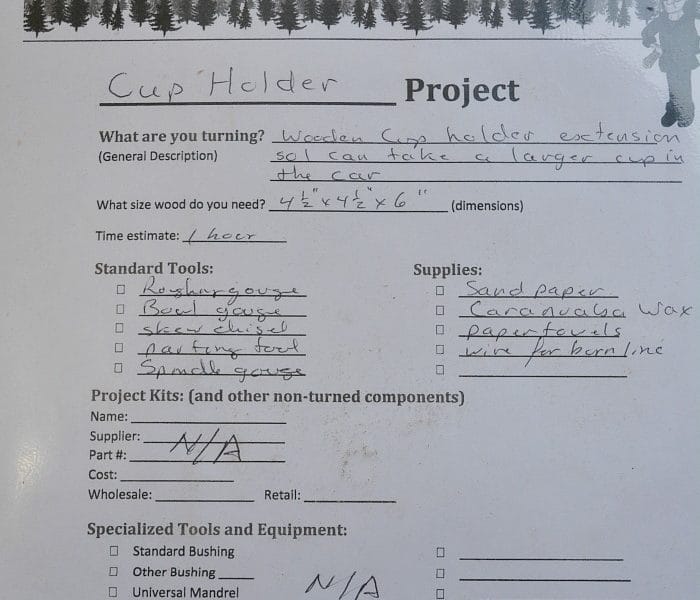
To help you out I’m going to run through a project that I’m planning on turning in the near future. This will show you the thought processes that I go through and how you might use the project notes to record your turnings. The first section of the project note is the name that you give the project and a section for a more descriptive presentation of the project. Use this area to capture the basic idea of your project and what you want it to do or be. My project is to turn a cup holder extension for my car. My favorite travel mug is too big for the cup holder that is built into the car. By using the extension I can place that in the normal cup holder and still hold my larger mug securely.
Project: Cup holder. Description: A wooden insert for a cup holder to hold larger travel mugs.
Wood and Time Estimate
These two items are not connected. However, for most turning projects you need an idea as to how large the wood should be. It is also good to either guess the time it will take you, or record the time that it actually took for the project. The time required will go down significantly for your 2nd, 3rd, and 4th turnings of the same project. For the cup holder extension I needed a fairly large turning blank. I figured this out with the drawings and planning that come later.
Woodturning Tools, Equipment, and supplies:
For beginners you may want to list the tools you need for each project. This is necessary if you are using a project book and you want to have all the right tools on hand. For more experienced woodturners I would write down the unusual or seldom used tools that this specific project requires. That could be a captive ring tool when making a baby rattle, it could be the mandrel and bushings needed for a specific pen type, etc.
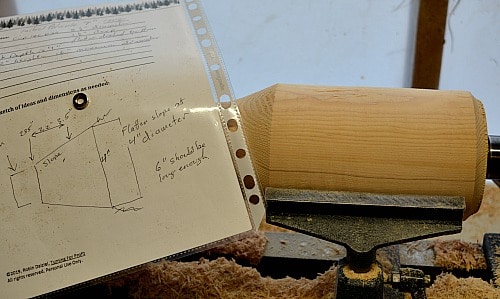
For this project I’ll need both spindle and bowl turning tools, which I have close at hand. There are no specific kits involved here just wood and the turner!
Project Kits:
A record of what kits you use and the equipment needed to use them will help you in planning your production, and it will also help your memory if you haven’t made this specific kit in a while. When you use drill bits or Forstner bits, record the size you used here as well. Make notes on any specific instructions or steps you used to work with the kit. Sanding the brass tubes in a pen kit, or what type of finish you used etc.
Specialized Tools and Equipment:
This is the spot to record any equipment that is absolutely necessary for this project. (I don’t mean your woodturning tools per se. But a captive ring tool and would be listed here if appropriate for your project such as a goblet with a captive ring on the stem, or a baby rattle. Turning pens, and other kits, often require a specific size of mandrel and bushings for the project to fit on the lathe. The bushings needed for each type of pen will vary as well. Use small bushings for a slim line pen and larger ones for a barrel or fountain pen. Recording your bushing size here will make it much easier when you come back to turn a similar pen later.
On more complicated projects you might want to record your woodturning equipment and power tools that you used as well. The amount of detail is up to you.
Specific Turning and Project Instruction:
These are the instructions for this project. It could be the steps, or order, that you do your turning in. When making a lidded box there is an order to turning the parts that will enable you to do the project with less re-chucking. For the project I’m going to make I can see that determining the right taper on the cup extension will determine the overall length of the project. To ensure I have enough room I’m going to start with the taper and then turn the top portion to hold my larger coffee cup.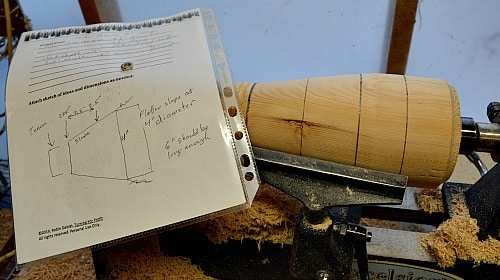
Project Notes:
Jot down the type of wood you’re using. Did the wood work for this project or not? What were the desired dimensions and how did it turn out? Not all projects go according to the plan. Record the adjustments that you made here. What were the challenges with this turning? Write down any tips, tricks, or procedures that you would want to remember in the future. Remember that these notes are for you. So your short-hand scribbles are perfect. It is not a school project and no one is going to judge you on how well you completed this shop note.
Attach sketch of ideas and dimensions as needed:
Often on my turning projects the specific size is not as important as the relationship of one part of the turning to another. A quick sketch or drawing can convey a lot of information about your turning project. You don’t have to be an artist or a draftsman to do this. Put the general idea of what you are aiming for on the paper. Two key things, it will help you get the information out of your head and onto the paper, and secondly nobody is going to see this but you! You will also get better over time.
If you need graph paper, grab a sheet and stable it to your shop notes. You can also take pictures with your phone and save them in a project folder on your computer. In that case jot the directory and file name on your paper right beside your title! I find that I can lose things in the computer almost as easy as in the stacks of paper on my desk! Take your finished shop notes and slip them into a sheet protector. You can pick them up at any office supply store or order them on-line. These protectors will keep your notes clean and readable even when covered by shavings on your workbench. They will also keep nicely in a three ring binder as well.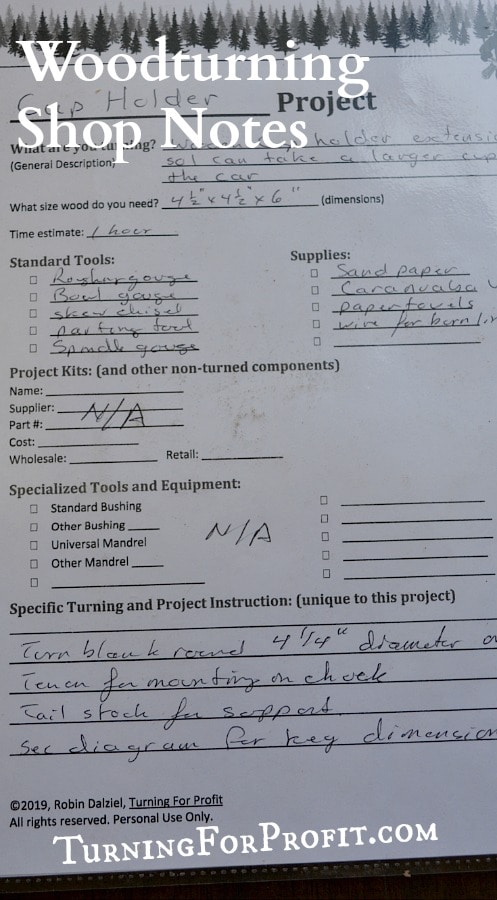
Download your free Shop Notes Template
Clicking on the button opens a pop-up box to collect your information. Please enable pop-ups in your browser if it doesn’t work. This will add you to my email list. If you wish to unsubscribe there is a link in the emails that will let you remove yourself from the email list.
Why keep shop notes?
These notes are a record of your projects, they represent the shop stories of your turning. If you are selling your woodturning projects keep a lookout for interesting aspects that will make the project a special purchase for the customer. Where the wood came from, challenges in the turning, or even what day you turned the project on (the fourth of July or April 1st!) and details and interest for your customers. These notes record the lessons you’ve learned about your woodturning.
Now that you’ve completed the record on one of your projects, whether simple or complex, how did the process go for you? If you are at all like me there will be times when I’m in the groove turning and notes and diagrams can just wait. That’s okay. Fill in the details when you come up for air. You may find you are missing some of the steps or key dimensions but you will have more than if you had no record at all. When you are repeating the project then you are going to follow your notes. For various reasons including forgetting the first time or inspiration on a different approach the second time, you can make modifications to your notes. Do what works for you and have fun turning this and your next woodturning project.






the download link is not working for me.
The download is working for me, but the adds are.
The download link is not working for me either.
I’ve edited the post to let people know that the button/link opens a pop-up window. So pop-ups need to be enabled in your bowser in order for the link to work. Hope this helps.
Looking forward to this.